DolphinScheduler 3.1.9 + Minio 开发环境【IDEA】搭建访问及相关问题处理

本文为按照官方提供的文档进行操作的整理总结。
1769069446354f45544e1f15485d0


点击蓝字 关注我们


17690694476277bf52acd937405bb

    注:本文为按照官方提供的文档进行操作的整理总结。

    1

    前提


    官方提供的开发手册位置:

    17690694481466cc6da7679aa5180


    Part.01

    软件要求

    在搭建 DolphinScheduler 开发环境之前请确保你已经安装以下软件:

    • Git
    • JDK: v1.8.x (当前暂不支持 jdk 11)
    • Maven: v3.5+
    • Node: v16.13+ (dolphinScheduler 版本低于 3.0, 请安装 node v12.20+)
    • Pnpm: v6.x


    Part.02

    克隆代码库

    通过你 git 管理工具下载 git 代码,下面以 git-core 为例


    mkdir dolphinschedulercd dolphinschedulergit clone git@github.com:apache/dolphinscheduler.git


    Part.03

    编译源码


    支持的系统:* MacOS* Linux【这个我没有运行试试】运行 `mvn clean install -Prelease -Dmaven.test.skip=true`

    2

    普通开发模式


    上面是官方提供的,我觉得有用就复制下来,

    这里开始我就按照自己的操作顺序记录


    Part.01

    编译问题


    1、git相关1-1:开启 Windows Git 长路径支持,管理员 PowerShell 执行,解决 DolphinScheduler 路径太深导致 git add 失败git config --system core.longpaths true1-2:先初始化git仓库,只在本地,不涉及账号、不推远程,Spotless 需要 HEADgit initgit add .git commit -m "initial commit"2、Maven 编译 / 格式化(IDEA 里的 Terminal)2-1:依赖 Git HEAD,自动修复格式问题mvn spotless:apply2-2:编译整个项目(跳过测试),确保所有模块已 installmvn clean install -DskipTests3、前端相关:查看 Node.js 是否已安装node -v查看 npm 版本npm -v安装 pnpmnpm install -g pnpmpnpm -v

    编译都没有问题

    17690694486716018139609f67758


    Part.02

    启动zookeeper

    官方内容

    下载 ZooKeeper,解压

    17690694490941638c042ddf0c9b2
    存储配置
    1769069449584221fe2dc8204a714
    启动脚本

    搞个txt编辑完后,后缀该bat即可


    @echo offecho 正在启动 ZooKeeper...cd /d E:\\install\\ZooKeeper\\zookeeper-3.8.3\\binzkServer.cmdpause


    Part.03

    workspace.xml 修改


    【可以不用,我也是看其他文章有添加的,不过我没添加也能正常运行,这里只做记录】


    在其他文章看到说在这里添加这行,说是让 IDEA 在运行时动态使用模块的 classpath,而不是用启动时生成的静态 classpath。注意点:这个作用只会影响本地 IDEA 启动,线上环境如果有问题这个是解决不了的。"dynamic.classpath": "true",
    176906945005476dc5a95fb249a94


    Part.04

    数据库

    我这里用的是mysql,所以需要修改

    4-1:数据初始化


    创建名为【dolphinscheduler】的新数据库后,把这个位置的sql直接拷贝复制执行即可。
    176906945052569389211da0c94de

    如图:
    1769069451018a267145c9118f38017690694514691573663bb7b5019b

    4-2:依赖相关修改


    如果使用 MySQL 作为元数据库,需要先修改 `dolphinscheduler/pom.xml`,将 `mysql-connector-java` 依赖的 `scope` 改为 `compile`,使用 PostgreSQL 则不需要test 改成 compile


    Part.05

    application.yaml 修改数据库配置

    176906945189419fb7785ef875dec
    5-1:dolphinscheduler-master


    如图,配置文件中修改这些数据:三个内容都是一样的spring:  config:    activate:      on-profile: mysql  datasource:    driver-class-name: com.mysql.cj.jdbc.Driver    url: jdbc:mysql://127.0.0.1:3306/dolphinscheduler?useUnicode=true&characterEncoding=utf8&zeroDateTimeBehavior=convertToNull&useSSL=true&serverTimezone=GMT%2B8    username: 账户名    password: 数据库密码
    176906945238280fec5a5692e3c55
    5-2:dolphinscheduler-worker
    1769069452863dd8b878f6a097c32
    5-3:dolphinscheduler-api
    17690694533738b8c06dfaa0951b7


    Part.06

    logback-spring.xml 修改日志级别

    176906945380887184f806d455903
    6-1:dolphinscheduler-master

    <appender-ref ref="STDOUT"/>
    1769069454316a3dc210092d8c7c8
    6-2:dolphinscheduler-worker
    1769069454817d6a846e9d932115c
    6-3:dolphinscheduler-api
    1769069455330210de280049ff418


    Part.07

    启动后端三个服务


    我们需要启动三个服务,包括 MasterServer,WorkerServer,ApiApplicationServer* MasterServer:在 Intellij IDEA 中执行 `org.apache.dolphinscheduler.server.master.MasterServer` 中的 `main` 方法,并配置 *VM Options* `-Dlogging.config=classpath:logback-spring.xml -Ddruid.mysql.usePingMethod=false -Dspring.profiles.active=mysql`* WorkerServer:在 Intellij IDEA 中执行 `org.apache.dolphinscheduler.server.worker.WorkerServer` 中的 `main` 方法,并配置 *VM Options* `-Dlogging.config=classpath:logback-spring.xml -Ddruid.mysql.usePingMethod=false -Dspring.profiles.active=mysql`* ApiApplicationServer:在 Intellij IDEA 中执行 `org.apache.dolphinscheduler.api.ApiApplicationServer` 中的 `main` 方法,并配置 *VM Options* `-Dlogging.config=classpath:logback-spring.xml -Dspring.profiles.active=api,mysql`。启动完成可以浏览 Open API 文档,地址为 http://localhost:12345/dolphinscheduler/swagger-ui/index.html> VM Options `-Dspring.profiles.active=mysql` 中 `mysql` 表示指定的配置文件
    7-1:MasterServer
    配置 VM Options


    按照操作配置这个:打开后填入即可-Dlogging.config=classpath:logback-spring.xml -Ddruid.mysql.usePingMethod=false -Dspring.profiles.active=mysql
    1769069576930f1085a05312e7869
    7-2:WorkerServer
    配置 VM Options

    跟上面一样操作:


    -Dlogging.config=classpath:logback-spring.xml -Ddruid.mysql.usePingMethod=false -Dspring.profiles.active=mysql
    7-3:ApiApplicationServer
    配置 VM Options

    -Dlogging.config=classpath:logback-spring.xml -Dspring.profiles.active=api,mysql
    1769069577448e70052d8086548b2

    总的就这三个:


    Part.08

    启动前端服务

    命令:


    安装前端依赖并运行前端组件cd dolphinscheduler-uipnpm installpnpm run dev
    176906957789200a4cae4cd6c6424
    17690695783172cb682cfac894552


    Part.09

    浏览器访问

    账号密码:


    浏览器访问:http://localhost:5173/home默认账号密码:账号:admin密码:dolphinscheduler123
    成功访问:
    1769069578751f40c3a3a72838604


    3

    相关问题


    存储未启用、租户\用户 指定

    问题:测试能否创建文件夹、上传文件等,提示【存储未启用】


    1769069579244ae7fbba384652b05176906957968501e57adfa9857ac8

    问题:当前登录用户的租户信息未被指定


    1769069580251b98315d79e4edfb8

    解决方法:

    Minio 安装、启动

    我这里直接用minio来尝试:

    1、Minio 创建 dolphinscheduler 桶
    2、commom.properties 修改

    配置文件改了这些地方
    1769069580683a7c50c40530985161769069581122766b71833cd790b1


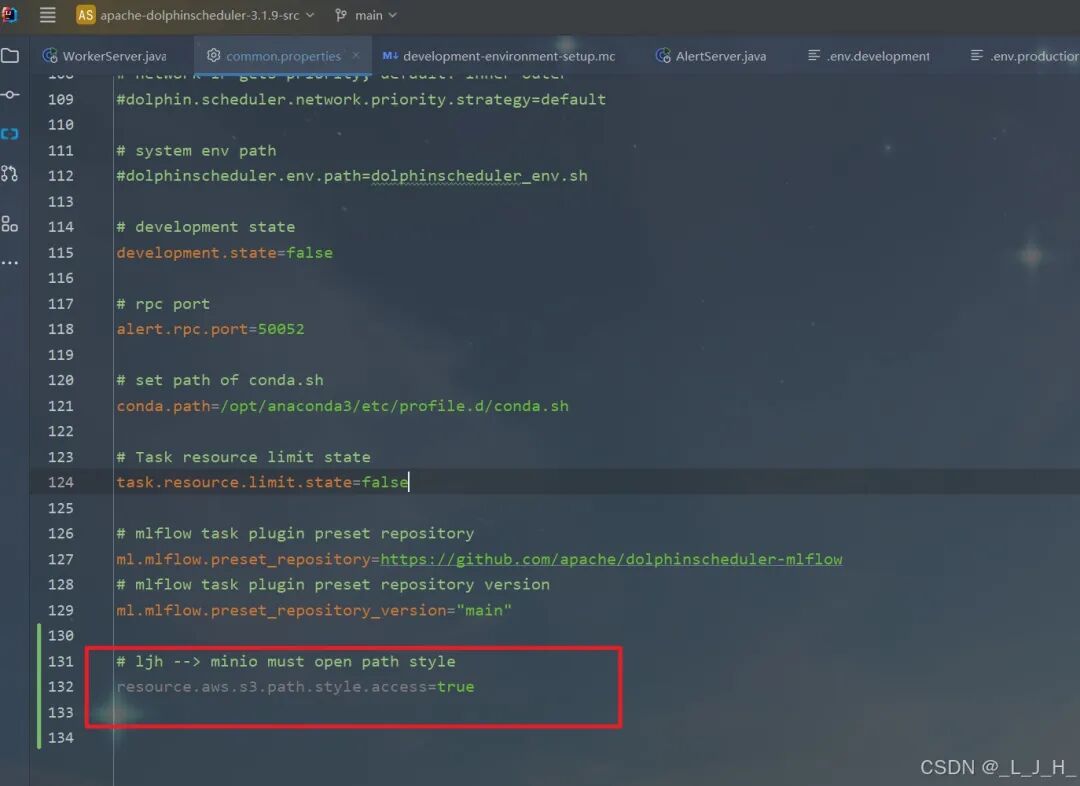
    # Licensed to the Apache Software Foundation (ASF) under one or more# contributor license agreements.  See the NOTICE file distributed with# this work for additional information regarding copyright ownership.# The ASF licenses this file to You under the Apache License, Version 2.0# (the "License"); you may not use this file except in compliance with# the License.  You may obtain a copy of the License at##     http://www.apache.org/licenses/LICENSE-2.0## Unless required by applicable law or agreed to in writing, software# distributed under the License is distributed on an "AS IS" BASIS,# WITHOUT WARRANTIES OR CONDITIONS OF ANY KIND, either express or implied.# See the License for the specific language governing permissions and# limitations under the License.## user data local directory path, please make sure the directory exists and have read write permissionsdata.basedir.path=/tmp/dolphinscheduler# resource view suffixs#resource.view.suffixs=txt,log,sh,bat,conf,cfg,py,java,sql,xml,hql,properties,json,yml,yaml,ini,js# resource storage type: HDFS, S3, OSS, NONE# ljh -->   S3 is Minio--------------------------------------resource.storage.type=S3# resource store on HDFS/S3 path, resource file will store to this base path, self configuration, please make sure the directory exists on hdfs and have read write permissions. "/dolphinscheduler" is recommendedresource.storage.upload.base.path=/dolphinscheduler# ljh --> The account and password of MinIO-------------------------------# The AWS access key. if resource.storage.type=S3 or use EMR-Task, This configuration is requiredresource.aws.access.key.id=minioadmin# The AWS secret access key. if resource.storage.type=S3 or use EMR-Task, This configuration is requiredresource.aws.secret.access.key=minioadmin# The AWS Region to use. if resource.storage.type=S3 or use EMR-Task, This configuration is requiredresource.aws.region=cn-north-1# ljh --> add bucket ------------------------------# The name of the bucket. You need to create them by yourself. Otherwise, the system cannot start. All buckets in Amazon S3 share a single namespace; ensure the bucket is given a unique name.resource.aws.s3.bucket.name=dolphinscheduler# You need to set this parameter when private cloud s3. If S3 uses public cloud, you only need to set resource.aws.region or set to the endpoint of a public cloud such as S3.cn-north-1.amazonaws.com.cn# ljh --> localhost convert  127.0.0.1resource.aws.s3.endpoint=http://127.0.0.1:9000# alibaba cloud access key id, required if you set resource.storage.type=OSSresource.alibaba.cloud.access.key.id=<your-access-key-id># alibaba cloud access key secret, required if you set resource.storage.type=OSSresource.alibaba.cloud.access.key.secret=<your-access-key-secret># alibaba cloud region, required if you set resource.storage.type=OSSresource.alibaba.cloud.region=cn-hangzhou# oss bucket name, required if you set resource.storage.type=OSSresource.alibaba.cloud.oss.bucket.name=dolphinscheduler# oss bucket endpoint, required if you set resource.storage.type=OSSresource.alibaba.cloud.oss.endpoint=https://oss-cn-hangzhou.aliyuncs.com# if resource.storage.type=HDFS, the user must have the permission to create directories under the HDFS root pathresource.hdfs.root.user=hdfs# if resource.storage.type=S3, the value like: s3a://dolphinscheduler; if resource.storage.type=HDFS and namenode HA is enabled, you need to copy core-site.xml and hdfs-site.xml to conf dirresource.hdfs.fs.defaultFS=hdfs://mycluster:8020# whether to startup kerberoshadoop.security.authentication.startup.state=false# java.security.krb5.conf pathjava.security.krb5.conf.path=/opt/krb5.conf# login user from keytab usernamelogin.user.keytab.username=hdfs-mycluster@ESZ.COM# login user from keytab pathlogin.user.keytab.path=/opt/hdfs.headless.keytab# kerberos expire time, the unit is hourkerberos.expire.time=2# resourcemanager port, the default value is 8088 if not specifiedresource.manager.httpaddress.port=8088# if resourcemanager HA is enabled, please set the HA IPs; if resourcemanager is single, keep this value emptyyarn.resourcemanager.ha.rm.ids=192.168.xx.xx,192.168.xx.xx# if resourcemanager HA is enabled or not use resourcemanager, please keep the default value; If resourcemanager is single, you only need to replace ds1 to actual resourcemanager hostnameyarn.application.status.address=http://ds1:%s/ws/v1/cluster/apps/%s# job history status url when application number threshold is reached(default 10000, maybe it was set to 1000)yarn.job.history.status.address=http://ds1:19888/ws/v1/history/mapreduce/jobs/%s# datasource encryption enabledatasource.encryption.enable=false# datasource encryption saltdatasource.encryption.salt=!@#$%^&*# data quality optiondata-quality.jar.name=dolphinscheduler-data-quality-dev-SNAPSHOT.jar#data-quality.error.output.path=/tmp/data-quality-error-data# Network IP gets priority, default inner outer# Whether hive SQL is executed in the same sessionsupport.hive.oneSession=false# use sudo or not, if set true, executing user is tenant user and deploy user needs sudo permissions; if set false, executing user is the deploy user and doesn't need sudo permissionssudo.enable=truesetTaskDirToTenant.enable=false# network interface preferred like eth0, default: empty#dolphin.scheduler.network.interface.preferred=# network IP gets priority, default: inner outer#dolphin.scheduler.network.priority.strategy=default# system env path#dolphinscheduler.env.path=dolphinscheduler_env.sh# development statedevelopment.state=false# rpc portalert.rpc.port=50052# set path of conda.shconda.path=/opt/anaconda3/etc/profile.d/conda.sh# Task resource limit statetask.resource.limit.state=false# mlflow task plugin preset repositoryml.mlflow.preset_repository=https://github.com/apache/dolphinscheduler-mlflow# mlflow task plugin preset repository versionml.mlflow.preset_repository_version="main"# ljh --> minio must open path styleresource.aws.s3.path.style.access=true
    3、dolphinscheduler 可视化页面添加租户

    安全中心 - 租户管理 - 创建租户

    176906958172296aabcc0d38b2bfb176906958215568d2bd83f62b7e89

    用户添加租户


    4

    演示

    创建文件夹、上传文件成功

    17690695825250638d1b160bc9990

    如图,数据已经存放在我指定的minio文件夹里面了


    17690695830173185c337eca27661


    1769069583437061239481d8ed255
    176906958386830f8814bdeb3f43f
    1769069583437061239481d8ed255

    1769069584777793b0af496dea826


    用户案例


    Cisco Webex天翼云Zoom网易邮箱 每日互动 惠生工程作业帮 博世智驾蔚来汽车 长城汽车集度长安汽车思科网讯食行生鲜联通医疗联想新网银行兴业证券唯品富邦消费金融 自如有赞伊利当贝大数据珍岛集团传智教育BigoYY直播 拈花云科太美医疗深圳某智能制造企业
    1769069584777793b0af496dea826


    迁移实战


    Azkaban Ooize(当贝迁移案例)airflow (有赞迁移案例)Air2phin(迁移工具)Airflow
    1769069584777793b0af496dea826


    最新发版消息


    Apache DolphinScheduler 3.3.2 正式发布!性能与稳定性有重要更新
    1769069584777793b0af496dea826


    加入社区


    关注社区的方式有很多:

    • GitHub: https://github.com/apache/dolphinscheduler
    • 官网:https://dolphinscheduler.apache.org/en-us
    • 订阅开发者邮件:dev@dolphinscheduler@apache.org(向邮箱发送任意内容,收到邮件后回复同意订阅即可)
    • X.com:@DolphinSchedule
    • YouTube:https://www.youtube.com/@apachedolphinscheduler
    • Slack:https://join.slack.com/t/asf-dolphinscheduler/shared_invite/zt-1cmrxsio1-nJHxRJa44jfkrNL_Nsy9Qg

    同样地,参与Apache DolphinScheduler 有非常多的参与贡献的方式,主要分为代码方式和非代码方式两种。

    非代码方式包括:

    完善文档、翻译文档;翻译技术性、实践性文章;投稿实践性、原理性文章;成为布道师;社区管理、答疑;会议分享;测试反馈;用户反馈等。

    ‍代码方式包括:

    查找Bug;编写修复代码;开发新功能;提交代码贡献;参与代码审查等。

    贡献第一个PR(文档、代码) 我们也希望是简单的,第一个PR用于熟悉提交的流程和社区协作以及感受社区的友好度。

    社区汇总了以下适合新手的问题列表https://github.com/apache/dolphinscheduler/pulls?q=is%3Apr+is%3Aopen+label%3A%22first+time+contributor%22

    优先级问题列表https://github.com/apache/dolphinscheduler/pulls?q=is%3Apr+is%3Aopen+label%3Apriority%3Ahigh

    如何参与贡献链接https://dolphinscheduler.apache.org/zh-cn/docs/3.2.2/%E8%B4%A1%E7%8C%AE%E6%8C%87%E5%8D%97_menu/%E5%A6%82%E4%BD%95%E5%8F%82%E4%B8%8E_menu

    如果你❤️小海豚,就来为我点亮Star吧!

    https://github.com/apache/dolphinscheduler


    176906965124547b6464bafe7d1de

    你的好友秀秀子拍了拍你

    并请你帮她点一下“分享”